Compound Microscope Parts Made Easy
The many compound microscope parts may seem overwhelming at first, but they all have a distinct purpose. This article will familiarize you with the basic parts of a compound microscope.

A compound microscope employs a system of lenses and light to magnify the specimen. A light bulb illuminates the slide from below, and a series of lenses then magnify the sample. These are the objective lens near the slide and the eyepiece on top.
The term “compound” refers to the compounding action of these two lenses, with each contributing to the magnification. This compound microscope effect gives you a broader range of viewing ability than a single lens would.
The result is that you can view larger items, such as insect wings, down to smaller items, such as tiny organisms in pond water.
This results in a two-dimensional image that you can adjust depending on the strength of your lenses.
With a little knowledge, a compound microscope is a wonderful tool for hobbyists, students, and scientists.
List and Diagram of Compound Microscope Parts:
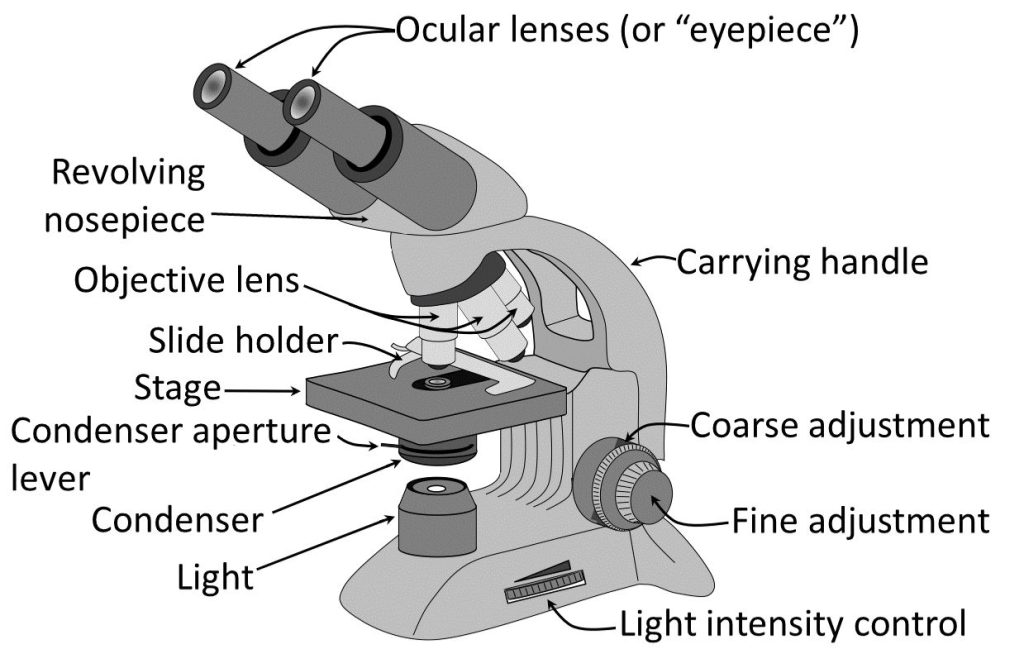
Head – The head is the uppermost part of the microscope that contains the eyepiece, tube, objective lens, and nosepiece. So all the optical parts of a compound microscope are in the head.
Eyepiece – The eyepiece is the lens at the top, and the part you look through when using the microscope. Usually, the eyepiece magnifies by 10x or 15x, although higher magnifications are available. Multiply the power of the eyepiece lens by the power of the objective lens to get the total magnification of the microscope. So if you have a 10x eyepiece and are using a 40x objective lens, you have a magnification of 400x.
Tube – This attaches the eyepiece to the objective lenses.
Objective Lenses – These are the microscope’s main lens system. They are located close to the specimen for maximum magnification. There are usually 3 or 4 objective lenses per microscope (the picture above has 3), and they usually have powers of 4x, 10x, 40x, and 100x respectively (one power per lens). Multiply the power of the objective lens in use by the power of the eyepiece to get the total magnification of the specimen.
Nosepiece – No, it’s not a place to rest your nose! The nosepiece holds the objective lenses, and rotates easily to allow you to select between them. It is also called the turret.
Arm – The arm supports the head and connects it to the base. Not all compound microscope parts will include an arm, but many will (especially those for kids and students).
Stage – The flat surface that holds the slide. A stage can have varying levels of movement. If it’s a mechanical stage, you’ll be able to use two different knobs to move the slide up or down, and left or right.
Stage Clips – The clips on the stage that hold the slide in place. If you don’t have a mechanical stage, the clips will help lock the slide in place after you have it where you want it. The clips aren’t labeled on this diagram but you can clearly see them holding the slide in place.
Aperture – The hole in the stage that allows light from the illuminator to hit the specimen. Not labeled in the above diagram but you can see it as a lightly glowing circle in the middle of the slide. (Above the reflection of the objective lens, which shows as a black circle).
Illuminator – The illuminator provides the light for the microscope. It’s usually a light bulb that’s located underneath the stage.
Focus Knobs (Coarse and Fine) – These knobs bring the specimen into focus by moving the stage. The coarse focus knob moves the stage up and down in larger increments, and the fine focus knob moves the stage up and down in smaller increments (allowing for greater control and more detail when focusing). These may be two separate knobs, or combined into one. In less advanced kids microscopes, there may only be one focus knob.
Base – The bottom part of the microscope. It’s used for support and to hold the illuminator.
Iris Diaphragm – This is a rotating disc with holes of various sizes that allows you to control the amount of light hitting the slide. It is mounted below the stage and above the condenser (if there is one). Depending on your specimen and magnification level, you may or may not need to use it. (It’s a matter of experimentation).
The iris diaphragm may also be called a disc diaphragm or aperture wheel. It’s not readily visible in the above picture, so here’s a shot of it from below (this is underneath the stage).
Other Parts of a Compound Microscope
There are a few more compound microscope parts not shown in the above image. The most common are:
Condenser – The condenser is another lens. Its purpose is to focus the light from the illuminator to the slide. Located underneath the stage, it usually contains the iris diaphragm as well (but not always, as we see above). Because it allows you greater focus and control over the light source, microscopes with condensers will show more detailed images than those without.
The disadvantage of the condenser is that it’s another lens to worry about focusing. This is why you often won’t see them on microscopes for kids. A microscope with a condenser will also have condenser focusing knobs that move the lens up and down.
Rack Stop – Some microscopes will have a rack stop, which is a small screw that prevents the objective lenses from cracking a slide by getting too close.
All of these compound microscope parts may seem overwhelming, but they become quite easy to use with practice.
Just treat your microscope gently and take the time to learn all the features.
You’ll be viewing specimens like a pro!
Are You Shopping for a Compound Microscope?
If you don’t have your microscope yet, here are some to consider at Amazon and eBay. (I may earn a commission if you buy one, at no extra cost to you.)
Check out new or pre-owned microscopes at eBay. You can sometimes find a great microscope at a lower price when you buy pre-owned. Just be careful to buy from a reputable seller who has checked the microscope for condition.
Amazon has a large selection and fast shipping for compound microscopes in all price ranges.


